Harrison Instruments
Model 151 Theremin User Manual
(Online Version for Instruments with Right-Side
Pitch)
Table of Contents
1. Safety Notices
<back to
contents>
Read all the instructions in this manual prior to using this product. Retain
these operating instructions for future reference.
 |
When this product is connected to an external device such as an amplifier,
a shock hazard may be present.
To avoid electric shock, do not operate this product in the rain or near
water.
Do not allow this product to become wet.
Do not replace or supplement this product's battery with an external power
supply. |
 |
Do not place cables connected to this product in areas where they
can cause a trip hazard. |
|
Do not play this instrument at a high volume, especially when using
headphones.
Hearing experts advise against the continuous, extended use of headphones. |
|
Do not disassemble this instrument. There are no user serviceable
parts inside.
Refer servicing to qualified service personnel. |
2. Unpacking and Inspection
<back to
contents>
The following items are contained in the carton:
-
One Model 151 Theremin
-
Two plastic envelopes with one plate antenna in each (interchangeable)
-
One plastic bag containing four hexagonal nuts for antenna attachment
-
One Duracell 9V alkaline battery
-
One Warranty Registration Card
-
One Model 151 Theremin User Manual
Please retain the carton and all packing materials in the event the instrument
has to be returned to Harrison Instruments for service.
Carefully remove the plastic wrapping from all items and inspect them for
damage.
If damage is apparent:
-
Notify the freight carrier immediately to make a damage claim.
-
Notify Harrison Instruments to report the damage and to obtain a Return Materials
Authorization (RMA) number.
IMPORTANT: Harrison Instruments must provide an RMA number for all returns.
-
Carefully pack the items to be returned, providing at least an inch of padding
around all surfaces. Use the original carton, if it is still intact, or an
equivalent. Seal the carton on all edges with packing tape and include the
RMA number on the shipping label. Send the merchandise POSTAGE PREPAID and
INSURED for its purchase value to the following address:
HARRISON INSTRUMENTS
RMA _____
PO BOX 9012
SILVER SPRING MD 20916
3. Additional Materials Required
<back to
contents>
The following items not supplied with the theremin are recommended for basic
use:
-
One adjustable-height microphone stand with a standard 5/8"-27 male thread
for attachment to the theremin's 5/8"-27 female threaded receptacle. Use
a stand suited to support the weight of the theremin without tipping.
Example: On-Stage Stands® model number MS9700B.
-
One 15-foot shielded audio instrument cable with 1/4" mono phone plugs at
each end for connecting the theremin to the amplifier/speaker system or audio
mixing console.
Example: Whirlwind® model number SN15. This item is also commonly called
a "guitar cable."
-
NOTE: The 151 is equipped with a standard mono "unbalanced"
output capable of delivering an maximum output level of about +2.7dBu, which
is compatible with most standard amplifier/speaker combination units. If
you intend to use your 151 with an amplifier or mixing console that has a
"balanced" (XLR or TRS 1/4") microphone input, then a small transformer,
such as Shure® model number A85F, along with an appropriate XLR cable,
such as Whirlwind® model number MC20, should be used.
-
-
One amplifier/speaker.
Examples:
The 5 Watt VOX® model DA-5. A compact, battery powered amplifier/speaker
appropriate for small venues, especially useful where mains power is unavailable.
It is conveniently equipped with a variety of effects processes such as
reverberation and echo.
The 20 Watt Peavey® model KB(R) 1. A small amplifier/speaker appropriate
for practice and for small to medium-size venues where the overall volume
requirement is modest.
The 300 Watt JBL® EON-15 G2. A large amplifier/speaker for major venues
where the overall volume requirement is high and direct, personal monitoring
is imperative. When stand-mounted behind the head, this unit, set to low
volume levels, is also ideal for practice. In particular, the inclusion of
good bass response permits practice in the low-pitch registers.
-
NOTE: If there is a retailer available in your area,
it is suggested that you try various models of amplifier/speakers before
making a purchase. Many retailers will schedule an appointment for "fitting"
an amplifier/speaker to your theremin. Select an amplifier/speaker that suits
your performance and practice intentions.
-
4. Introduction to the Theremin
<back to
contents>
The theremin is named for its Russian inventor, Lev Sergeivitch Termen who
developed the instrument in the early 1920s. It is one of the first electronic
musical instruments, and has the distinction of being played by moving the
hands within its proximity, without contact.
Theremins have two physical extensions called antennas. One of the
antennas is used to control the pitch of the instrument's sound, and is referred
to as the pitch antenna. The other is used to control the volume of
the sound, and is referred to as the volume antenna. The pitch and
volume produced by the theremin vary according to the capacitance
between the hands and their respective antennas. The value of capacitance,
in turn, is affected by the distance between each hand and its antenna.
The pitch-generating section of many theremins, including the Harrison
Instruments Model 151, utilizes a principle called heterodyning, in
which the signal from two inaudible, high-frequency oscillators are subtracted
electronically to produce an audible difference frequency. One of
the two high frequency oscillators provides a steady frequency, while the
other oscillator's frequency is varied according to the change in capacitance
between the hand and the pitch antenna. The volume-control section also uses
changes in hand capacitance to alter the energy in a resonant circuit
that, in turn, controls the loudness of the tone.
Many early designs of the theremin featured a vertical rod for the pitch
antenna and a horizontal loop for the volume antenna. The 151 features two
identical horizontal plates, one each for pitch and volume. The 151 also
differs from traditional theremin designs in that the loudness of the tone
increases as the hand is brought closer to the volume antenna, instead of
becoming softer.
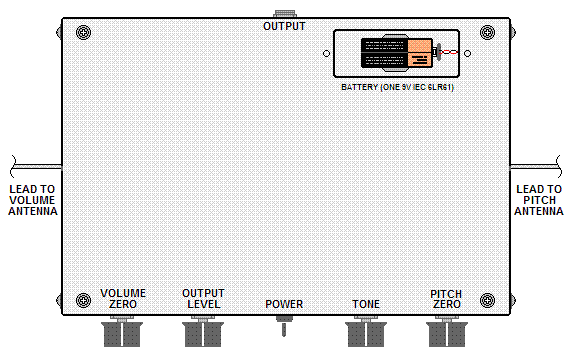
5. Model 151 Controls and Output Jack
<back to
contents>
The figure below identifies the front-panel features of the Model 151 Theremin.
To provide visibility, the labels for the controls are located on the top
of the instrument. The OUTPUT JACK is located on the rear panel.

The following table describes the function of each feature.
Feature |
Function |
VOLUME ZERO |
Adjusts the response of the theremin's volume so that the tone is softest
with the hand furthest away from
the volume antenna and loudest when the hand is just above the volume antenna. |
OUTPUT LEVEL |
Adjusts the theremin's maximum output volume. |
POWER LED |
Indicates when the instrument is on, and flashes rapidly when the battery
is weak. |
POWER SWITCH |
Turns the theremin on or off. |
TONE |
Adjusts the output tone characteristic from a low-harmonic, sine-like wave
(fully counterclockwise position)
to a harmonically-rich wave (fully clockwise position). |
PITCH ZERO |
Adjusts the response of the theremin's pitch so that the tone frequency is
lowest with the hand furthest away
from the pitch antenna, and highest when the hand is just above the pitch
antenna. |
6. Battery Installation
<back to
contents>
The figure below is a top view of the Model 151 Theremin. The 9V battery,
such as Duracell® type MN1604, is shown in the battery compartment with
the cover removed. Note that the battery is installed with its terminals
to the right and with its NEGATIVE terminal on top. The battery connector
is snapped onto the battery with its wires also toward the top cover. The
battery compartment cover is secured with two small slotted screws that may
be removed with a standard, small-blade pocket screwdriver. To prevent damage
to the instrument from possible leakage or corrosion, do not leave the battery
in the theremin for extended periods of non-use. To prevent accidental battery
consumption during shipment, the 151 Theremin is shipped with the battery
uninstalled.
7. Setting Up the Model 151 Theremin
<back to
contents>
-
Loosen the BASE LOCKING KNOB on the microphone stand and slide the legs to
the bottom of the OUTER TUBE. Tighten the
BASE LOCKING KNOB.
-
Fully extend the microphone stand LEGS and place the stand on a stable, level
surface.
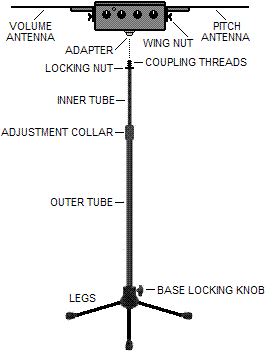
-
If the stand has a LOCKING NUT, turn it completely clockwise so that the
COUPLING THREADS are exposed above it.
-
While grasping the INNER TUBE to preventing it from falling into the OUTER
TUBE, loosen the stand's height
ADJUSTMENT COLLAR by turning it counterclockwise. The stand's INNER TUBE
is now free to slide up and down.
-
Continue to grasp the INNER TUBE with one hand while lowering the THEREMIN
onto the top of the stand with your free hand.
-
Engage the theremin's threaded ADAPTER with the stand's COUPLING THREADS.
-
With the theremin perpendicular (90°) to the stand, slowly rotate the
stand's INNER TUBE counterclockwise until it mates with the theremin's ADAPTER.
Rotate the stand's INNER TUBE, and not the theremin, until it is tightly
engaged with the ADAPTER.
-
If the stand has a LOCKING NUT, tighten it by turning it clockwise against
the ADAPTER.
-
Adjust the stand's height so that the top of the theremin is at waist level.
Firmly tighten the stand's height ADJUSTMENT COLLAR.
-
NOTE: To prevent damaging the threads on either the
microphone stand or the theremin, always engage the theremin to the stand
at a perpendicular (90°) angle and support the theremin so that the
angle is maintained as the microphone stand's INNER TUBE is rotated into
the theremin ADAPTER. Never force the threads and never freely spin
the theremin on the coupling threads, as doing so will ruin the adapter.
To prevent excessive wear, occasionally place a small amount of light machine
oil on the stand's COUPLING THREADS.
-
-
The antennas supplied are identical and interchangeable and may be attached
with either side up.
Attach the VOLUME ANTENNA to the left side of the THEREMIN using two of the
the four HEXAGONAL NUTS supplied. Hand-tighten the nuts securely. Do not
use pliers. Repeat for the PITCH ANTENNA on the right side.
-
Set the THEREMIN's POWER ON-OFF SWITCH to the "OFF" position (down).
-
Insert one end of the (user-supplied) audio instrument cable into the theremin
OUTPUT JACK and the other end into the (user-supplied) amplifier/speaker
system.
-
Set the theremin's front panel controls as follows:
-
VOLUME ZERO: Fully counterclockwise (Note: this control has ten
turns)
OUTPUT LEVEL: 9 o'clock position
TONE: Middle (12 o'clock) position
PITCH ZERO: Fully clockwise (Note: this control has ten turns)
-
Perform the following steps with your hands or other objects away from the
antennas:
-
-
Set the amplifier volume control to its minimum level.
-
Set the theremin's POWER SWITCH to the "on" (up) position. Note that the
theremin's LED is illuminated.
-
Slowly increase the amplifier's volume control to approximately one-tenth
of its maximum range.
-
Slowly turn the VOLUME ZERO clockwise until a tone just becomes apparent
in the speaker.
-
Turn the PITCH ZERO counterclockwise until the pitch of the tone begins to
decrease. Continue turning the control just until tone becomes inaudibly
low in pitch.
8. Playing the Model 151 Theremin
<back to
contents>
In the above procedure, the theremin was prepared for operation. However,
a few more steps must first be performed before it is completely ready to
play. First, it is important that the user is familiar with the following
concept:
The output from the theremin is affected by the presence of any object,
including any part of your body, within about four feet of either of its
antennas. This means that your body position and body movement, and not just
your hand positions, will affect the output pitch and volume. The player
will not have exactly the same stance in front of the instrument each time,
and the theremin's proximity to large objects such as furniture or walls
will vary from one setup to another. Because of these factors, the theremin
must be adjusted to compensate for these variations before it is played,
as described in the following procedure.
In steps 1 through 3, the volume response will be adjusted:
-
Stand directly centered in the front of the theremin, with your waist about
six inches away. If you are using headphones, allow the cord to droop neatly
downward from behind you, away from either antenna. It is important to remain
still as you play because the proximity of your torso to the theremin will
affect its behavior.
-
Lift your left hand so that it is about one foot above the volume antenna.
Note the volume level as your hand is lowered toward the antenna; the volume
becomes louder as the distance between your hand and the antenna decrease.
Touch the volume antenna with your hand and observe the volume. This is the
loudest volume, and it may be adjusted with the OUTPUT LEVEL control. While
still touching the volume antenna with your left hand, adjust the OUTPUT
LEVEL control for a comfortable volume.
-
Adjust the VOLUME ZERO control to obtain the following response:
a) The output tone is not present with your left hand away from the antenna
(your left arm at your side).
b) The output tone just becomes apparent with your left hand about one foot
above the volume antenna. Note that the volume control distance will become
smaller as the VOLUME ZERO control is turned counterclockwise, and
larger as it is turned clockwise.
-
NOTE: A smaller volume control distance is suited
to rapid staccato passages. Smoothly flowing, legato passages
may be obtained with larger control distances.
-
In steps 4 through 7, the pitch response will be adjusted:
-
-
Purposely offset the VOLUME ZERO control by turning it clockwise so
that a tone will be present, even without the left hand near the volume antenna.
-
Lift your right hand so that it is about one foot above the right antenna
(pitch antenna). Note that the pitch increases as the distance between your
hand and the antenna decreases.
-
Adjust the PITCH ZERO control to obtain the following response:
a) The pitch is lowest with with your right hand about two feet above the
antenna.
b) The pitch is highest with your right hand about one inch above the
antenna.
Note that the pitch control distance will become smaller as the PITCH
ZERO CONTROL is turned counterclockwise, and larger as it is turned
clockwise.
-
Readjust the VOLUME ZERO control to remove the offset that was applied in
step 4.
-
NOTE: To obtain more spacing between notes in the
alto or soprano range, you may offset the PITCH ZERO control
so that a middle pitch is obtained with your right hand away from the antenna.
This will result in a smaller total pitch range, but will also provide more
space between notes. Alternatively, shifting your stance so that you are
slightly closer to the pitch antenna will also cause this offset to occur.
As with any musical instrument, individuals will develop their own particular
style for playing theremin. As a general guide, it is suggested that the
hands are positioned above the antennas with vertical movement used as the
primary means of changing pitch and volume. Some lateral movement of the
hands is natural and can be useful in avoiding the monotony of purely vertical
motion. However, the player should watch their hands to prevent them from
drifting too far from the optimal sensing area. Movements of the individual
fingers of the pitch hand, a technique often used by thereminists playing
"pole" type instruments, may also be employed when playing the 151 Theremin,
although the intervals obtained for the same movements will differ for the
two types of instruments.
It is not uncommon for beginning thereminists to become tired from holding
their hands in position for extended periods, although they usually become
accustomed after several sessions. Repeated, abrupt, jerking motions should
be avoided because such motions may cause stress and injury to the joints.
Since some repositioning of the body while playing is inevitable, it is
recommended that the thereminist periodically check the response of the pitch,
making sure that the lowest pitch is attained for a hand distance of about
two feet. The high resolution and smooth operating character of the 151's
PITCH ZERO control allows quick corrections to be made during a performance.
While standing is traditional, the theremin may also be played comfortably
while seated. In this case, a short microphone stand should be used with
the 151 Theremin.
There are many practice methods available for the thereminist. The ability
to recognize the actual pitch of a note (e.g. "A" or "A#") is not required,
but the ability to maintain and repeat the interval relationships between
notes is important. It is recommended that the beginner start by playing
along to a recorded melody while concentrating on obtaining the corresponding
hand positions. In initial exercises, it is desirable to concentrate just
on the pitch hand, while simply maintaining a fixed distance with the volume
hand. The ability to use the volume hand to emphasise individual notes and
provide the all-important dynamics of loudness will be attained intuitively
once the student is comfortable with pitch control.
The rapid, cyclic motion of the pitch hand to create vibrato is a
common technique. In this manner, the optimal desired pitch may be included
within the extents of the vibrato range, therefore attaining the "perfect"
pitch, at least momentarily. Vibrato typically spans the range of a quarter-tone
to a full-tone interval and is an effective way to enhance technique. However,
the ability to attain correct pitch with practically no vibrato is also a
desirable skill. The same cyclic motions applied to the volume hand can also
be used effectively for tremolo.
Recording your theremin sessions is an invaluable tool for improvement. After
several practice sessions, it is suggested that the student play back a solo
of moderate length and observe the accuracy of the pitch intervals and ability
to maintain the desired key. Improvement may also be attained by
accompanying other instrumentalists. It is suggested that beginners find
group opportunities without a vocalist, since the theremin may likely be
used to play melody and possibly "compete" for the vocal range. One of the
advantageous features of the 151 Theremin is its capability to produce bass
tones, which may add a valuable element to the overall mix. While the theremin
is often used for lead lines, it can also be used effectively in harmony
or as backup.
The prospect for adding special effects to the theremin is limitless, but
it is recommended that beginners first concentrate on playing "dry," perhaps
with a small amount of reverberation added to provide presence. Reverberation
also provides a small amount of persistence that some players find useful
for attaining accurate intervals. While, historically, the theremin has been
used to provide non-melodic sound, as in the stereotyped use for "special
effects" in film, it is also capable of providing the means for articulate,
accurate melodic work, given proper attention and adequate skill.
9. Grounding and Portable Operation
<back to
contents>
A proper earth ground is essential for the 151 Theremin to operate predictably
and provide the benefits of its full pitch and volume sensing distances.
In mains-powered installations, the theremin receives its ground through
the audio instrument cable that connects the theremin to the amplifier/speaker
or mixing console.
Portable operation does not provide the convenience of such a direct ground
connection. However, the proper configuration of the audio instrument cable
that connects the theremin to the amplifier/speaker can readily provide an
adequate substitute. To achieve this, it is recommended that the cable, such
as the recommended 15-foot Whirlwind® model number SN15, be laid in an
approximate circular pattern immediately around the feet of the theremin
stand and the player. Spread the cable out in a small area immediately in
the vicinity of the stand to ensure that there is adequate capacitive coupling,
and therefore grounding of the theremin, to the surface shared by the player
and the instrument. The exact lay of the cable is not critical, but it is
important not to "bundle up" the excess cable in one spot.
Note that specific adjustment to the VOLUME ZERO and PITCH ZERO controls
must be made each time the theremin is relocated. Part of these adjustments
address differences in the effectiveness of the grounding among different
locations. For example, the optimal settings of the ZERO controls will change
by several full rotations for a 151 played in a recording studio in a steel-frame
and concrete building, compared to one played through a battery-powered portable
amplifier/speaker on a wood stage situated on a dry, sandy terrain.
Although many portable amplifiers provide multiple instrument and mic inputs,
it is important that your portable unit be specifically dedicated to the
theremin alone. This is because the variations in ground coupling from other
inputs, for example, a guitar that is being moved while played, will affect
the pitch and volume of the theremin.
|
Do not place cables connected to this product in areas where they
can cause a trip hazard. |
10. Tone Control
<back to
contents>
The TONE control on the 151 Theremin provides a wide variety of sound qualities.
When fully counterclockwise, the theremin's tone will be sinewave-like, mostly
devoid of harmonics. The fully clockwise setting of the TONE control will
produce a wave similar in qualities to a full-wave rectified sinewave, which
is harmonically rich. Between these two extremes, a variety of tone qualities
are available, including some that are similar to many other types of theremins.
|
CAUTION: Low-pitched tones, especially sinewaves, do not seem loud,
but they may produce sufficient power to cause damage to amplifiers and
loudspeakers. When setting up the theremin, always start with your
amplifier/speaker system volume control settings at low levels to prevent
damage. It may be desirable to use an equalizer and/or limiter at the theremin's
output to match the performance of your audio system. |
NOTE: The degree of pitch accuracy attained by any
particular thereminist, actual or perceived, may vary depending on the tone
of the theremin. In some instances where a high-level accompaniment or high
ambient noise is present, the thereminist may elect to adjust the tone for
a more sine-like quality so that most of the sound energy is in the fundamental
region, therefore making it easier to attain the correct pitch. Many other
factors also contribute to what tone may be most appropriate; for example,
a sine-like tone, dissimilar to the sounds produced by most conventional
instruments, may "stand out" too much in a mix, creating a sense of
incompatibility with other instruments.
11. Model 151 Theremin
Specifications
<back to
contents>
| Useful pitch range |
Five octaves (55 Hertz to 1760 Hertz) |
| Available pitch range |
Seven octaves (27 Hertz to 3520 Hertz) |
| Nominal pitch sensing distance |
18 inches |
| Pitch response |
Frequency increases as hand distance decreases
(View Graph) |
| Tone waveform characteristic range: |
Sine-like wave to fully-rectified sine-like wave |
| Volume dynamic range |
62dB minimum |
| Nominal volume sensing distance |
14 inches |
| Volume response |
Volume increases as hand distance decreases
(View Graph) |
| Control compliment |
Volume Zero (10-turn potentiometer)
Output Level (1-turn potentiometer)
Power Switch
LED Power and Low Battery Indicator
Tone (1-turn potentiometer)
Pitch Zero (10-turn potentiometer) |
| Output connector |
1/4" Mono Phone Jack for standard audio instrument cable |
| Output impedance |
Approximately 900 Ohms |
| Maximum output level |
3 Volts Peak-to-Peak |
| Power source |
One IEC 6LR61 9V Alkaline Battery,
Duracell® MN1604 or equal |
| Battery life (active or idle) |
24 hours, minimum |
| Operating temperature range |
30°F to 100°F |
| Storage temperature range |
-10°F to 120°F |
| Overall dimensions (without antennas): |
17"L x 8"W x 3"H |
| Overall dimensions (with antennas): |
26"L x 8"W x 3"H |
| Antenna dimensions |
5.5" x 8" Rectangular Plates |
| Weight |
Approximately 3.5 Pounds |
| Shipping weight |
Approximately 4.3 Pounds |
12. Troubleshooting Guide
<back to
contents>
Symptom |
Possible Cause |
Recommended Action |
| The LED does not illuminate when the POWER SWITCH is in the
"UP" (on) position. |
The battery is dead or weak. |
Replace the battery.
(Refer to Section 6, "Battery
Installation.") |
| The battery connector is not making proper contact. |
Examine the terminals on both the battery and the battery connector and
gently reshape both female terminals by slightly squeezing their edges together. |
| The LED flashes rapidly. |
The battery is weak. |
Replace the battery within an hour of further use.
(Refer to Section 6, "Battery
Installation.") |
| There is no sound from the speaker. |
The LEVEL control on the theremin is set too low. |
Turn the theremin LEVEL control clockwise. |
| The volume control on the external amplifier or external sound system
is set too low and/or an input selector switch is set incorrectly. |
Increase the volume and/or gain of the external amplifier or sound
system;
check relevant selector switch positions. |
| The audio instrument cable connecting the theremin to the external equipment
is defective. |
Replace the cable with a known-good one. |
| The sound is distorted. |
The LEVEL control on the theremin is set too high for the external amplifier
or sound system. |
Reduce the theremin output by turning the LEVEL control counterclockwise
until the sound is undistorted. |
| The gain and/or volume control on the external amplifier or external
sound system is set too high. |
Reduce the gain and/or volume of the external sound system. |
| A decrease, instead of increase of pitch occurs as the hand is brought
closer to the pitch antenna. |
The PITCH ZERO control is not adjusted properly. |
Turn the theremin ZERO controls clockwise until the desired
response is obtained.
(Refer to Section 7, "Setting Up the Model
151 Theremin,"and Section 8, "Playing
the Model 151 Theremin.") |
| The pitch scale is constrained within too short a range of hand positions.
For example, the lowest pitch occurs when the hand is 5 inches away from
the antenna. |
| The volume range is constrained within too short a range of hand positions.
For example, the volume range begins when the hand is 5 inches away from
the antenna. |
The VOLUME ZERO control is not adjusted properly. |
| No tone results even when both hands are brought very close to the antennas. |
The PITCH and/or VOLUME ANTENNA nuts are loose |
Hand-tighten all four nuts securely. (Do not use pliers.) |
| The tone and/or volume abruptly shifts dramatically. |
| The note positions change while the theremin is played. |
There are variations in your body position. |
Hold your body at a consistent distance from the theremin, and only move
your hands up and down above the antennas. |
| Objects are being moved in the proximity of the theremin. |
Eliminate moving personnel and objects within a four-foot proximity of
the theremin, or move the theremin to a less-trafficked area. |
| Sporadic pitch shits are evident in the pitch of the tone, even when
the hands are held steady. |
There is interference from a nearby electronic device and/or
another theremin. |
Move the theremin to a different area. |
| There is a persistent "fluttering" of the pitch of the tone and/or the
volume level. |
| When used with a battery-powered amplifier/speaker, the PITCH ZERO control
can not be adjusted adequately to obtain a useful scale; the scale is constrained
within too short a range of hand positions even when the PITCH ZERO control
is fully clockwise. |
There is an inadequate ground connection. |
Refer to Section 9,
"Grounding and Portable Operation." |
| When used with a battery-powered amplifier/speaker, the VOLUME ZERO control
can not be adjusted adequately to obtain a range; the volume range is constrained
within too short a range of hand positions even when the VOLUME ZERO control
is fully clockwise. |
| A pitch change occurs when the volume hand is moved, even when the pitch
hand is held steady. |
| People have an annoyed expression when they hear you play. |
Your pitch is too inaccurate. |
Practice attaining adequate pitch recognition and control.
Do not despair, because the times when you feel you are making the least
progress are probably when you are actually learning and improving the most. |
| You are playing too loud for them. |
Reduce the theremin output by turning the LEVEL control counterclockwise. |
| They dislike the tone quality. |
Change the tone quality with the TONE control. Setting the control control
in a range between 9 o'clock an 3 o'clock will produce less obtrusive tones.
In general, the extreme counterclockwise position will produce a tone that
is most subject to criticism. |
| Those people have no general appreciation for music. |
Find more appreciative people. |
13. Model 151 Theremin Warranty and Repair
Service <back to
contents>
Harrison Instruments Two-Year Limited Warranty
Harrison Instruments Corporation ("Harrison Instruments") warrants this
product to be free from defects in materials and workmanship for a period
of two (2) years from date of purchase, PROVIDED, however, that this limited
warranty is extended only to the original purchaser and is subject to the
following conditions, exclusions and limitations hereinafter set forth:
This limited warranty shall be void and of no effect, if:
-
The first purchase of the product is for the purpose of resale; or
-
The original purchase of the product is not made from Harrison Instruments;
or
-
The product has been damaged by accident or unreasonable use, neglect,
improper maintenance, or other causes; or
-
The serial number affixed to the product is altered, defaced, or removed;
or
-
The product's enclosure is opened by any party not authorized by Harrison
Instruments.
In the event of a defect in materials or workmanship covered by this limited
warranty, Harrison Instruments will repair the defect in materials or workmanship
without charge or replace the product, at Harrison Instruments' option, provided
however, that in any case, all costs of shipping for the purpose of shipping
the product to Harrison Instruments for repair are paid by you, the
purchaser.
THE WARRANTY REGISTRATION CARD SHOULD BE ACCURATELY COMPLETED AND MAILED
TO AND RECEIVED BY HARRISON INSTRUMENTS WITHIN FOURTEEN (14) DAYS FROM THE
DATE YOU RECEIVE THE PRODUCT.
In order to obtain service under this warranty, you must:
-
Contact Harrison Instruments and obtain a Return Materials Authorization
(RMA) number.
-
Ship the defective product, FREIGHT PREPAID and INSURED for its purchase
value, to:
HARRISON INSTRUMENTS
PO BOX 9012
SILVER SPRING MD 20916
-
Include a complete, detailed description of the problem.
-
Include a complete return address.
If the defect can be remedied under this limited warranty and other terms
and conditions expressed herein have been complied with, Harrison Instruments
will provide the necessary warranty service to repair or replace the product
and will return it to you, the purchaser.
Limitation of Liability
Harrison Instruments' liability to the purchaser from any cause whatsoever
and regardless of the form of action, including negligence, is limited to
the the amount of the original purchase price of the product that caused
the damage or that is the subject of, or directly related to, the cause of
action.
Harrison Instruments does not assume liability for personal injury or
property damage arising out of, or caused by, any or all alterations or
attachments to its products, nor does Harrison Instruments assume any
responsibility for damage to interconnected non-Harrison Instruments products
that may result from the normal functioning and maintenance of Harrison
Instruments products.
.
UNDER NO CIRCUMSTANCES WILL HARRISON INSTRUMENTS BE LIABLE FOR ANY
LOST PROFITS, LOST SAVINGS OR COLLATERAL, ANY INCIDENTAL DAMAGES, OR ANY
CONSEQUENTIAL DAMAGES ARISING OUT OF THE USE OR INABILITY TO USE ITS PRODUCTS,
EVEN IF HARRISON INSTRUMENTS HAS BEEN ADVISED OF THE POSSIBILITY OF SUCH
DAMAGES.
.
THIS LIMITED WARRANTY IS IN LIEU OF ANY AND ALL WARRANTIES, EXPRESSED
OR IMPLIED, INCLUDING, BUT NOT LIMITED TO, THE IMPLIED WARRANTIES OF
MERCHANTABILITY AND FITNESS FOR A PARTICULAR USE.
14. Contacting Harrison Instruments
<back to
contents>
Contact Harrison Instruments by e-mail at
sales@harrisoninstruments.com
or in writing at:
HARRISON INSTRUMENTS
PO BOX 9012
SILVER SPRING MD 20916
(Back to 151 Theremin product description
page)
Copyright Notice: This manual, either in electronic or printed form, ©2008
by Harrison Instruments, Incorporated.
Harrison Instruments, Incorporated reserves the right to make changes to
this manual without prior notice.
Publication Number 151UM-1
Rev. 3 08-01-2014
-