Test and Calibration Procedure for the 144 Theremin
(back to contents)
-
Apply power to the instrument by connecting the 9 volt battery and setting
the power switch to the "ON" position.
-
Place both potentiometers in their central positions. Remove any objects
(test leads, hands, etc.) within two feet of the antennas.
-
Connect a DC voltmeter (10v DC scale) to the circuit as follows:
Meter NEGATIVE lead to the board's lower-most, right-most terminal (circuit
ground).
Meter POSITIVE lead to the positive (lower) lead of 220uF capacitor C14
(regulated +7.5v).
-
Observe +7.50vdc +/-0.35vdc.
-
Connect an oscilloscope (50mv/div. vertical sensitivity, AC coupled; 5uS/div.
horizontal sweep rate, internally triggered) as follows:
Oscilloscope GROUND LEAD to circuit ground.
Oscilloscope PROBE to positive (lower) lead of 220uF capacitor C14 (regulated
+7.5v).
-
Observe less than 40mv peak-to-peak power supply noise.
-
Connect the oscilloscope PROBE to R35's left terminal, which is the output
of the PITCH REFERENCE OSCILLATOR. (Oscilloscope set for 2v/div. vertical
sensitivity, DC coupled; 1uS/div. horizontal sweep rate, internally
triggered.)
-
Observe the modified sine wave form in FIGURE 1: 3.8v peak-to-peak with the
upper excursion at 7.5v, and a period of approximately 3.6uS.
-
Connect the oscilloscope PROBE to R39's lower terminal, which is the output
of the PITCH VARIABLE OSCILLATOR.
-
Observe the modified sine wave form in FIGURE 1: 3.8v peak-to-peak with the
upper excursion at 7.5v, and a period of approximately 3.6uS.
-
Move your hand to and from the PITCH ANTENNA and observe that the wave form
period increases slightly with decreasing hand distance. The total period
variation will be approximately 100nS, corresponding to a frequency deviation
of approximately 7.5kHz.
-
NOTE: To obtain an audible output from the theremin, the two pitch oscillators
must be very similar in frequency; it is their difference frequency, generated
by the MIXER, that equals the audible pitch. Therefore, critical adjustment
of these oscillators' frequencies is important.
For uncalibrated instruments, the initial relation of the two pitch oscillators
will not produce an audible MIXER output. Assuming this is the case, the
next step is to adjust variable capacitor C22, and observe if the MIXER output
shifts toward a lower frequency.
Connect the oscilloscope PROBE to R13's lower terminal, which is the output
of the MIXER. (Oscilloscope set for 200mv/div. vertical sensitivity, AC coupled;
1mS/div. horizontal sweep rate, internally triggered.) Remove any objects
(test leads, hands, etc.) within two feet of the PITCH ANTENNA. Route
oscilloscope and other leads away from the oscillator areas, as their presence
will affect the frequencies.
-
Observe the wave form while slowly adjusting capacitor C22.
Adjust C22 so that the AC wave form is absent with the hand away from the
PITCH ANTENNA, and rising as the hand approaches the antenna. For a difference
frequency of 50Hz, the MIXER output wave's amplitude will be about 1.7v AC
peak-to-peak. At this frequency, the wave will be pulse-shaped with significant
assymetry, exhibiting a marked rate discontinuity in the rising slope. As
the frequency increases, the wave will become more sinusoidal. At 400Hz,
the wave's amplitude will be about 800mv AC peak-to-peak.
If the two oscillators' frequencies differ substantially, no AC wave form
will be evident at the MIXER output, and either C23 in the PITCH REFERENCE
OSCILLATOR or C29 in the PITCH VARIABLE OSCILLATOR will require an additional
paralleled capacitor to lower its respective oscillator frequency.
If the adjustment of C22 alone produces satisfactory results, proceed to
step 22. If not, steps 14 through 21 provide a procedure for adding the extra
capacitor.
-
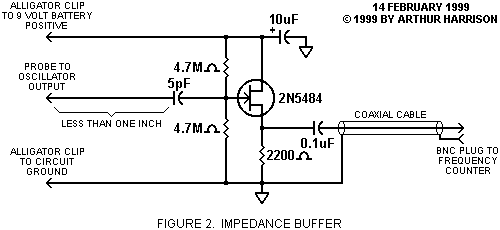
A frequency counter may be used to measure the specific frequencies of the
two oscillators. Use the IMPEDANCE BUFFER in FIGURE 2 to prevent the frequency
counter from loading the measurement points.
-
Connect the IMPEDANCE BUFFER's output to the frequency counter. Connect the
IMPEDANCE BUFFER's input to the output of the PITCH REFERENCE
OSCILLATOR (R35's left terminal).
Make the connection between the IMPEDANCE BUFFER and the circuit short and
direct (less than one inch of unshielded wire) to prevent excessive capacitive
loading of the circuit. Route test leads away from the oscillator area, as
their presence will affect the frequency.
-
While slowly adjusting C22, observe the counter. Select a position which
produces an approximate median frequency. This corresponds approximately
to the mid-value of C22's capacitance, leaving sufficient margins for subsequent
adjustments.
-
Record the indicated frequency.
-
Connect the IMPEDANCE BUFFER's input to the output of the PITCH VARIABLE
OSCILLATOR (R39's lower terminal). Be certain that no objects are within
proximity of the PITCH ANTENNA. Route test leads away from the oscillator
area, as their presence will affect the frequency.
-
Record the indicated frequency.
-
Determine which of the two oscillator's frequencies are higher. That oscillator's
frequency will be lowered with the addition of a paralleled capacitor.
-
To lower the frequency of an oscillator, add paralleled capacitance to:
C23 for the PITCH REFERENCE OSCILLATOR or
C29 for the PITCH VARIABLE OSCILLATOR.
Obtain two each of the following mica capacitors: 5pF, 10pF, 22pF, and 47pF.
(One set is reserved for adjustments in the volume circuit.)
Capacitance adds when capacitors are paralleled. The combination of a 5pF
unit in parallel with 390pF (C23 or C29), for example, will result in a total
capacitance of 395pF. The next convenient increment may be obtained by replacing
the 5pF unit with the 10pF unit, resulting in 400pF, total. With the 10pF
unit still in place, the 5pF capacitor may then be added, making a total
of 390pF + 10pF + 5pF = 405pF.
The four suggested values may be applied in various combinations for a range
from 395pF to 474pF in approximate 5pF increments.
Continue the paralleling procedure, as necessary, until the oscillator's
frequency becomes just less than the desired value. Then, readjust C22 slightly
so that the MIXER's AC output wave form is absent with the hand away from
the PITCH ANTENNA, and commences, rising in frequency, as the hand approaches
the antenna.
-
Use the PITCH NULL POTENTIOMETER to "fine-tune" the instrument's response
to the pitch hand's position. Optimally, the onset of the MIXER output will
occur with the hand at about two feet from the antenna.
NOTE: The distance-to-pitch relationship may be reversed, the highest pitch
evident with the hand away from the antenna, depending on the specific adjustment
of C22 and the PITCH NULL POTENTIOMETER.
-
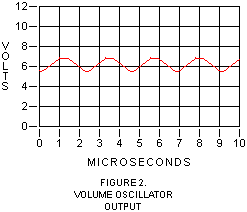
Connect the oscilloscope PROBE to R4's lower terminal, which is the output
of the VOLUME OSCILLATOR. (Oscilloscope set for 2v/div. vertical sensitivity,
DC coupled; 1uS/div. horizontal sweep rate, internally triggered.)
-
Observe the modified sine wave form in FIGURE 2: 1.4v peak-to-peak with the
upper excursion at 7v, and a period of approximately 2.2uS.
-
Move your hand to and from the VOLUME ANTENNA and observe that the wave form
period remains constant.
-
Connect the oscilloscope PROBE to Q2's source terminal. (Oscilloscope set
for 1v/div. vertical sensitivity, DC coupled; 1uS/div. horizontal sweep rate,
internally triggered.) Route test leads away from the VOLUME PROCESSOR and
VOLUME ANTENNA areas, as their presence will affect the circuit's resonant
frequency.
-
Slowly adjust C2 while observing the oscilloscope. Observe a sine wave, centered
at approximately 4 volts, that varies in amplitude as C2 is adjusted. The
amplitude value of the sine wave should vary from approximately 0.5v to 2v
peak-to-peak.
If the VOLUME OSCILLATOR frequency differs substantially from the
parallel-resonant frequency of L2 and C7 in the VOLUME PROCESSOR, an insufficient
sine wave amplitude and amplitude variation will result at Q2's source. In
this case, either C3 in the VOLUME OSCILLATOR or C7 in the VOLUME PROCESSOR
will require an additional paralleled capacitor to properly match the VOLUME
OSCILLATOR's frequency to the VOLUME PROCESSOR's resonance.
If the adjustment of C2 alone produces satisfactory results, proceed to step
29. If not, refer to step 28, which provides a procedure for matching of
the VOLUME OSCILLATOR's frequency to the VOLUME PROCESSOR's resonance.
-
With the oscilloscope PROBE still at Q2's source, set the vertical amplifier
to AC coupling and center the trace. Increase the oscilloscope's vertical
sensitivity until a wave form is visible.
Start by adding a 5pF capacitor in parallel with C3 in the VOLUME OSCILLATOR
circuit. Note the wave form's amplitude. If it increases with the addition
of the 5pF capacitor, replace the 5pF capacitor with a 10pF capacitor and
determine if a further increase is evident. Repeat this procedure with successive
combinations of paralleled capacitors until the greatest possible wave form
amplitude is obtained.
If the above procedure does not result in an increase in wave form amplitude,
remove any additional capacitors from C3, and repeat the paralleling procedure
with C7 in the VOLUME PROCESSOR circuit, instead, until the greatest possible
wave form amplitude is obtained.
-
With the oscilloscope PROBE still at Q2's source, adjust C2 so that the wave
form amplitude is maximum with the hand furthest from the VOLUME ANTENNA,
becoming smaller as the hand approaches the antenna. The wave form amplitude
is greatest when the parallel-resonant frequency of L2 and C7 in the VOLUME
PROCESSOR equals the frequency of the VOLUME OSCILLATOR.
-
Connect the oscilloscope PROBE to Q3's collector terminal. (Oscilloscope
set for 1v/div. vertical sensitivity, DC coupled; 1mS/div. horizontal sweep
rate, internally triggered.) Observe a DC voltage level that varies from
approximately 1v to 6.5v with the hand's proximity to the VOLUME ANTENNA.
NOTE: depending on C2's specific adjustment, the relationship of hand position
to voltage may not be proportional, i.e., a 3v level might occur for two
different hand distances, one near and one far from the antenna. The DC voltage
level at Q3's collector terminal is lowest when the parallel-resonant frequency
of L2 and C7 in the VOLUME PROCESSOR equals the frequency of the VOLUME
OSCILLATOR.
-
Once an adequate response at Q3's collector is observed, connect the oscilloscope
PROBE to the MIXER's output (R13's lower terminal). Adjust the PITCH NULL
POTENTIOMETER so that a wave form is present regardless of the hand's proximity
to the PITCH ANTENNA. This will provide a constant signal to further calibrate
the volume circuit. The exact frequency of the wave form is not critical;
any frequency around 400Hz will suffice.
-
Connect the oscilloscope PROBE to Q6's collector terminal. Slowly adjust
C2 while observing the oscilloscope. An AC wave form should appear within
a segment of C2's adjustment range. Set C2 to the position where the wave
form just appears.
-
Move your hand near the VOLUME ANTENNA and observe that the wave form's amplitude
increases as the hand's proximity decreases. NOTE: There are two different
C2 positions that will satisfy this criteria, however, only one of the adjustment
positions will provide the proper volume response. Correct calibration will
be evident when the onset of the wave form at Q6's collector terminal occurs
with the volume hand approximately 18 inches from the VOLUME ANTENNA, increasing
in amplitude as the hand becomes closer. "Fine-tune" the volume response
with the VOLUME NULL POTENTIOMETER. Return the PITCH NULL POTENTIOMETER to
it's normal position.
-
Connect headphones to the OUTPUT JACK of the instrument. Place each hand
in the proximity of their respective antennas, and observe an audible pitch
that may be frequency modulated with one hand's proximity to the PITCH ANTENNA
and amplitude modulated with the other hand's proximity to the VOLUME
ANTENNA.
Text and drawings ©1999, 2002 by Arthur Harrison
(back to contents)


