204 Theremin Printed Circuit Assembly
Technical Data
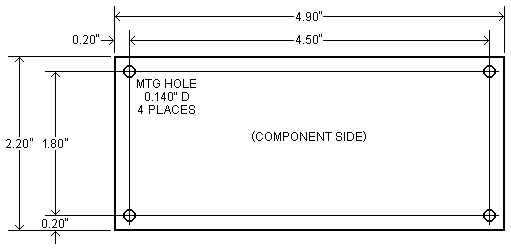
| DIMENSIONS | 4.9" X 2.2" X 0.60" |
| WEIGHT | 1.5 OUNCES |
| OPERATING TEMPERATURE RANGE | +40°F TO +90°F |
| STORAGE TEMPERATURE RANGE | -10°F TO +120°F |
| POWER SOURCE | 9 VOLT ALKALINE BATTERY |
| OPERATING VOLTAGE RANGE | 7.5 TO 12.0 VOLTS |
| CURRENT CONSUMPTION (POWER SUPPLY = 9 VOLTS) |
5 MILLIAMPERES, TYPICAL |
| LINE OUTPUT AMPLITUDE (FREQUENCY = 160 Hz, 10,000 OHM LOAD)) |
350mV PEAK-TO-PEAK |
| SPEAKER OUTPUT AMPLITUDE (FREQUENCY = 160 Hz, 45 OHM IMPEDANCE SPEAKER LOAD) |
3V PEAK-TO-PEAK |
| PITCH RESPONSE TO HAND POSITION (WITH CIRCUIT GROUNDED AND RECOMMENDED ANTENNA) |
(VIEW GRAPH) |
| LINE OUTPUT NOISE AT ZERO BEAT (BANDWIDTH = 20 Hz TO 20 KHz) |
LESS THAN 2mV PEAK-TO-PEAK |
| OUTPUT IMPEDANCE | 900 OHMS |
| LOCAL OSCILLATOR FREQUENCY | 455 KHZ, TYPICAL |
Note: The output noise may be influenced by external interference,
which will vary depending on the instrument's proximity to emissive sources
such as power lines, fluorescent lighting fixtures, incandescent lamp dimmers,
and computers. This interference may be remedied by moving the theremin away
from such sources.
Dimensions and Hole Locations
Installation and Calibration Instructions
Install the assembly in its working position within a suitable enclosure or onto a chassis, securely mounting it with four standoffs, 1/2" or more above the surface. The assembly may be installed on a metallic or non-metallic surface, although a metallic surface is preferred for best performance characteristics.
The assembly is optionally capable of driving a small, 45 Ohm impedance loudspeaker at a moderate volume level. If a loudspeaker is not used, leave terminal J6 unconnected.
Provide an access hole for the blue "ZERO CAL" calibration capacitor through the enclosure or chassis. This is recommended to ease calibration with the enclosure cover(s) in place.
Interconnect the printed circuit assembly and related items as shown in the Typical Application section of the Product Description Page. Wires connecting to the assembly should not be run directly against, or in close proximity to the assembly. Do not install the 9V battery until all the items have been mounted (after step 7).
The connection between the external 1000 ohm resistor and the assembly may be extended directly away from terminal J11 with a short length of lead-in wire, however, excessive wire length will add to the antenna input capacitance, and may possibly exceed the calibration range. For this reason, it is recommended that the antenna lead-in wire, if required, be limited to less than 6 inches in length. The wire lengths for the other items (potentiometer, jack, speaker, battery and switch) are unrestricted.
When mounted to a metal enclosure or chassis, the use of metallic standoffs will automatically ground the assembly via the mounting hole closest to terminal J1. In this case, the free end of the neon lamp should be connected to the nearest convenient point on the same enclosure or chassis. If, however, the assembly is mounted to a non-conductive surface, the free end of the neon lamp must be connected to J7 (circuit ground) with a separate ground wire. If this method is used, keep the ground wire away from the lead-in wire used for the J11 antenna input, because the close proximity of these wires will otherwise add to the antenna input capacitance.
Connect a suitable, grounded amplifier to the Output Jack.
Remove objects within 3 feet of the Antenna.
Set the Pitch Zero Potentiometer to mid position.
Install the 9V battery and set the power switch to the "on" position.
Using a small-blade screwdriver, carefully adjust the blue ZERO CAL calibration capacitor so that no tone is evident in the amplifier's speaker when the hand is removed from the proximity of the antenna, and a low-pitch tone becomes evident when the hand is approximately 18 inches above the antenna. The pitch should rise in frequency as the hand is moved closer to the antenna. Do not apply excessive force to the ZERO CAL calibration capacitor.
After calibration is complete, use the Pitch Zero Potentiometer to fine-adjust the pitch response as needed.
If the instrument is used with its internal speaker, and without connection
to an external grounded amplifier, the Pitch Zero Potentiometer will require
readjustment in order to obtain the correct pitch response. If readjustment
of the Pitch Zero Potentiometer does not provide the correct response, then
readjustment of the blue ZERO CAL capacitor may also be required.
(Back to 204 Printed Circuit
Assembly Product Description)
(Back to Harrison Instruments' Main Page)
04-17-2007